This is a project to build a lake house at Land between the Lakes in Dover, TN.

Sunday, April 24, 2016

Container Home: Putting the House Underground - 24 April 2016

This was a very big weekend for me. We got the containers underground!!! Yes, they are now mostly underground. We left the two ends exposed until the gabion baskets arrive either this week or next. While passing by Straight Line Fencing in Clarksville, TN, I noticed they have polished rocks. That is all that we are going to need for the baskets. The backsides will be exposed to the gravel and dirt, so we are going to attach the polished rocks to the side facing the driveway and then fill the inside with the gravel.

The first thing I had to do was to finish installing the sewage plumbing inside. I used my plasma cutter to cut out the holes in the wall and then ran the piping through and connected it to the outside piping.


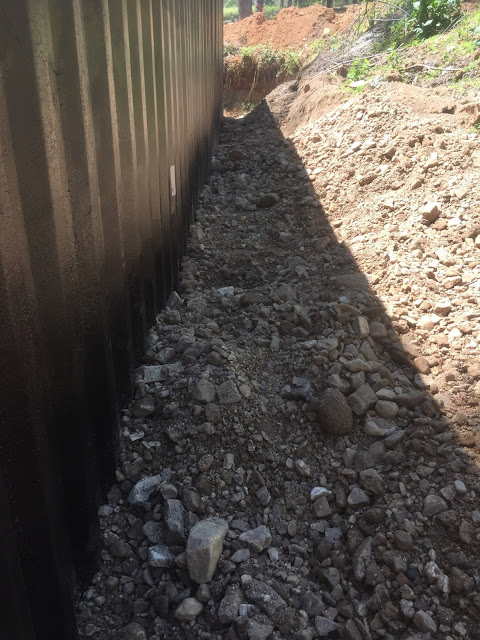
After those were installed, the next thing was to haul the gravel in and put it up against the wall. It took a total of four dump truck loads of gravel to fill it up. Here is a video as we were getting started.

These are pictures of what it looked like after we put most of it underground. This one is looking from the left side where the driveway will be located.


Here is another picture further out from the driveway side.


Here is one looking from the front side.


Finally, here is one looking from the right side. As you can see, we left off the far right for the gabion baskets on that side. Oh yeah, you can also see the solar panels on the roof.


After I got it underground, I noticed it slight pushed the roof up. To counter this, I installed 4x4's at the ceiling which are plenty to hold that back.


The internal steel I-Beams worked great at holding the walls in place. It is going to take a little while for the gravel to completely settle. Next weekend, I will be installing the rest of the 4x4's that will serve three functions. The first is that they will provide structural integrity to the ceiling. Second, they will give structural reinforcement to the i-beams. Third, they will reinforce the roof. Fourth, they will provide an attachment point for the internal wood construction.


Here is a video of burying the container:


Next weekend, I am going to install the rest of the 4x4's and install screws into the steel plates beneath the i-beams for additional support.
Share:

Sunday, April 17, 2016

Container Home: Second Coat of Epoxy and Drainage Piping - 17 April 2016

The first thing my wife and I did was to apply a second coat of the coal tar epoxy to the side walls. I don't want to have to dig those out again due to any rust. After that, we got the sewage piping installed around the containers. It took quite a while but we finally finished that Saturday afternoon. We first had to start out with cutting the cinder blocks so the drainage pipe would lay flat on the ground for maximum drainage.


This is what it looks like up close.


The next thing we did was to install the sewage pipe, which is colored in turquoise. You can see in the picture below where the joint is that the kitchen sink will drain out to.


This is a picture of the joint that travels around the corner of the container. You can also see the material over the white drainage pipe that keeps sediment from going in.


Here is the picture of the pipe on side of the containers. I added an emergency pipe to the geothermal piping in the even flooding was massive enough to flood those pipes. Also, the wire you see near the bottom is the high speed internet line.


Once we finished this, we began pouring the riverbed gravel over it. The gravel now comes up 1/4 of the height of the containers.


Here is another picture. I still need to cut out the holes in the side to run the sewage pipe out. That is why you can barely see the two ditches in the pipe that will have the drain pipes running out of the wall and into the main sewage pipe.


Share:

Sunday, April 10, 2016

Container Home: Installing Final Structural Ceiling I-Beam - 10 April 2016

This weekend, I finished up installing the last of the i-beams down the center of the containers. These give it the structural reinforcements it needs since the center walls were cut out.


Here is the final picture of it after it was welded in place.


The next thing I did was to finish welding the container to the foundation. As you saw earlier in this blog, I inlaid steel in the concrete so the containers could be welded. Here is a picture of one of the welds. This is before I cleaned up the weld.


The next thing I did was to weld the seam down the center of the container. I had to wait on this until I had the I-beams installed because the house jacks sat on that seem holding the beams up while I welded them.


The final thing I did was to temporarily secure the solar panels on the roof. I tied them down with rope so they won't blow off. They will be permanently installed later on when the trees are cut down to make room for them.

Share:

Monday, April 4, 2016

Container Home: Installing Structural Wall Supports - 04 April 2016

This weekend, I hauled my final two loads of steel. I know my Jeep is glad of that with hauling 890 pounds on the roof. It included the last two 6" i-beams for reinforcing the ceiling and the final six 4" i-beams for reinforcing the walls.


I got the final six i-beams welded in place to finish reinforcing the two walls that will be underground.


After getting the wall supports finished, I began on the ceiling supports. Due to problems I ran into with the back support, it took up much of my time. After I got it welded in place, I got started putting the center support in place, which entailed not only hoisting it up, but also cutting it down to size so that it would fit in place.

To get it hoisted up, I used a hoist in the center and then attached one strap on each end of the beam to support the ends.


As I slowly hoisted it up, I had to readjust the straps on each end, which is what took so long.


The hoist could only pull it up so far. I finally had to remove the hoist and replace it with a third strap. To slowly adjust the straps on the ends, I had to hold the beam with my shoulder while I released the strap to be able to pull it up further. Yes, my shoulders are sore today! Here is a final picture of the beam in place. I put the house jacks underneath it to push it the last few inches. I did not have enough time yesterday evening to weld it, so that will be done next weekend.


Another thing I did this weekend was to mark the trees that must be cut down to make room for the solar panels. This is a picture of the trees I marked with the ribbon around them. Luckily, a neighbor saw the marked trees and asked why they were marked. He is going to cut them down for me and take all of the wood for firewood. There will be no cost to me for that.


Another thing I did was to clear the concrete path around the container so that we can implement the concrete blocks for the drainage and sewage pipes. I also put the final seal of foam at the base of the containers.


The other thing I did was to make the current four solar panels permanent so that I no longer have to haul the deep cycle battery back with me. They are now mounted on the roof. When the trees are taken down, I am going to move the panels to their final resting place.

Share:

BTemplates.com

About Me

My photo
http://about.me/pletchermick
Powered by Blogger.