This was the first application of the spray foam. Since then, I applied one more tank full to the house. I am going to be applying a third application to coat all of the steel beams.
Sunday, September 18, 2016
Sunday, July 31, 2016
Container Home: Installing the Main Door and Electricity - 31 July 2016
It has been quite a while since I
last updated the blog. There has been a lot done on the house.
The first thing we did was to finish installing the
sliding glass door.After I got the vertical beams installed, I needed to get the horizontal ones. In order to do this, I had to make sure the height was going to be precise with the sub floor, backer board, and tile.

This was after I used the plasma cutter to cut the bottom line across.

Here is after I got the top cut out.
The next thing was welding the two horizontal beams in place to finish out the door frame.

At that point, the door was ready to be installed.

After that, I finished up the last of the roof, at least almost the last. I still need to do the very last tiles. I am waiting because they will need to be ground down as well as the back side before applying the coal tar epoxy. One more gallon should finish it up.

The next thing we did was to apply Por 15 to all of the vertical support i-beams. Por 15 is one of the best sealants to use. We did just the vertical beams right now so that we could go ahead and install the subflooring.

We got all of the subflooring installed.

The next thing we did was to begin framing out the interior walls. So far, we have gotten the bathroom, part of the bedroom, and part of the kitchen framed.
This picture was taken of the bedroom framing.

This was framing of the bathroom.

I went back last weekend to begin installing the solar panels and there was a serious problem. Mold had formed on the framing because I had used regular wood. Thankfully there is a special coating you can apply to prevent mold in the future. I first sprayed down the mold with bleach and killed all of it off. Next weekend, I will be applying the coating which can be applied directly to the mold if anymore has formed.
The next thing I did was to begin installing the electrical system. Currently, there will be 400 watts of solar panels. I am going to upgrade that to 800 watts in the near future. I needed to make the 4 gauge wires to connect the batteries together. That is not an easy task. You have to use a crimping device that requires a sledge hammer since the connectors are so thick.

I have installed four 105 amp hour batteries. Yeah, I did not get all of them hooked up because I did not have the nuts for two of the batteries. I chose this plastic shelf because it is not vulnerable to acid if a leak occurred.
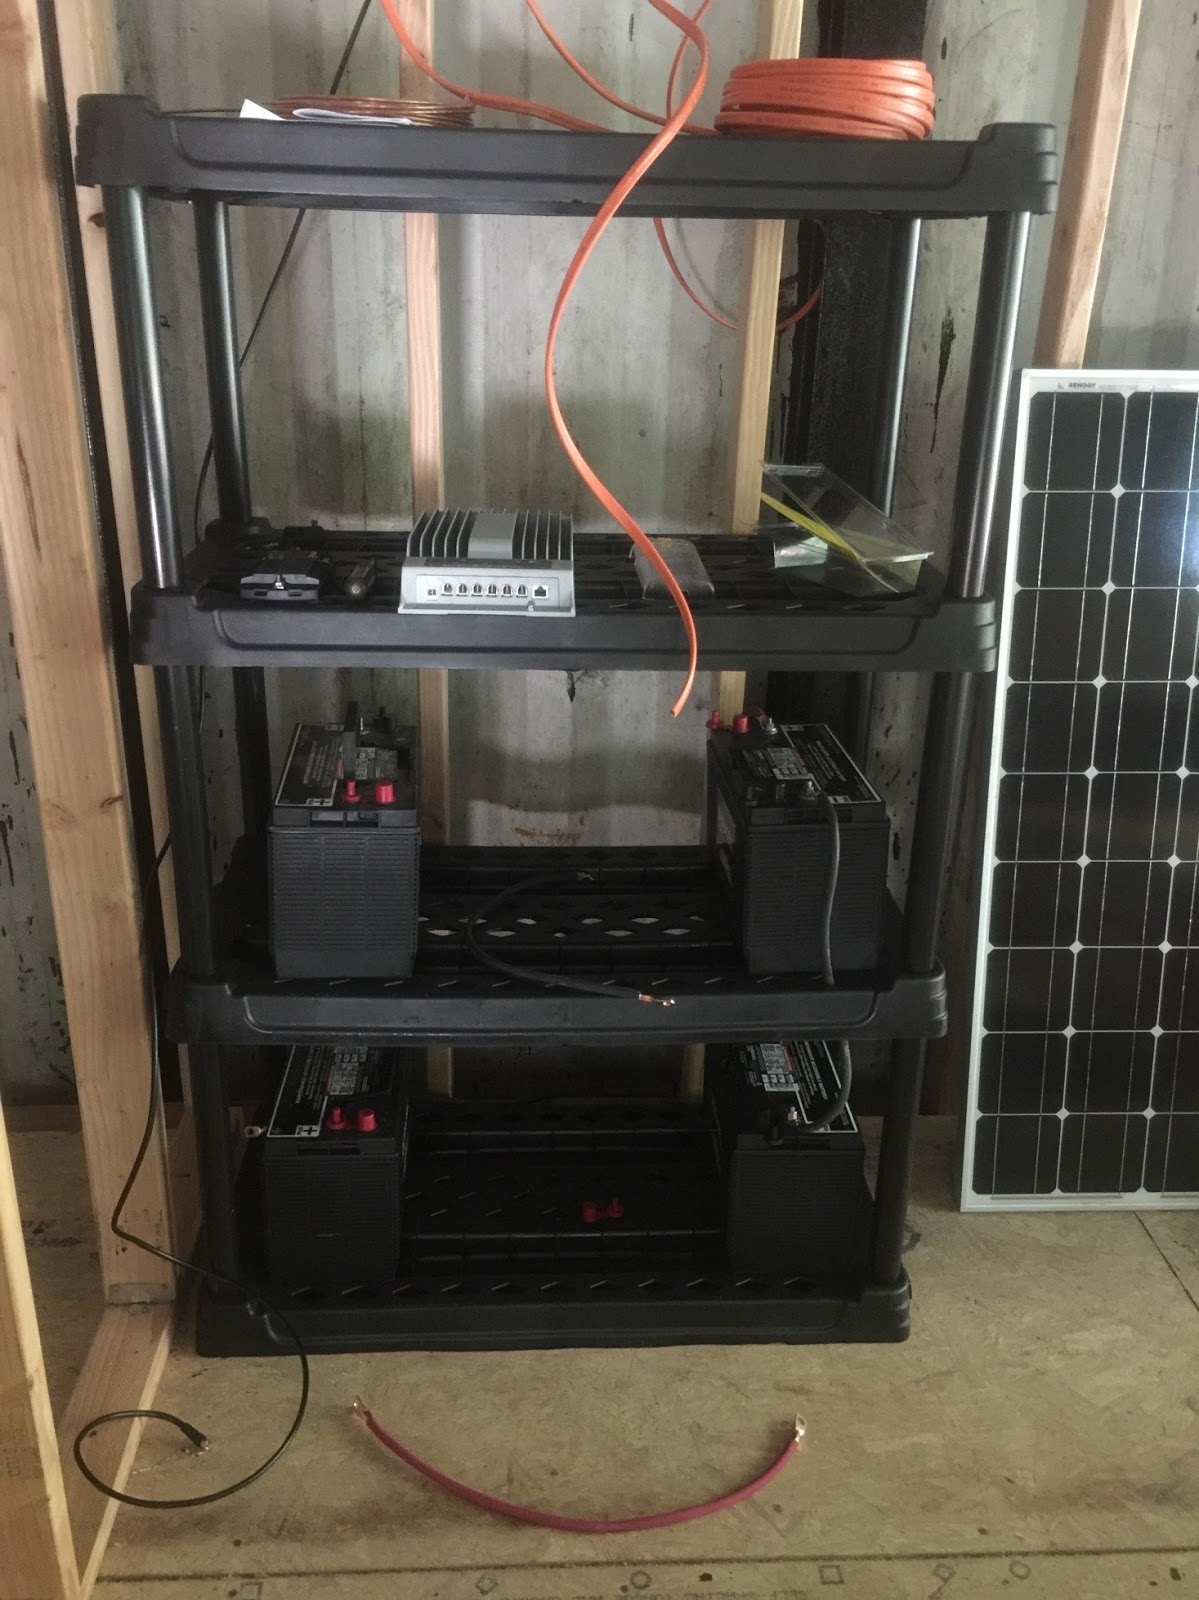
After I got the batteries setup and the cables made, I installed the fuse panel and regulator. I am using the 40 amp Renogy Commander regulator. I used 8 awg wiring to connect it all up. I also used a regular fuse box on the right for wiring my fuses. There are twelve negative terminals and 12 positive terminals.

I also got some of the wiring run throughout the house last weekend. I found these 12v outlets that will work great for us.

Finally, the last thing I got done was to get our street number and put up a street number post. The post office told me that since this is a secondary home, a mailbox is not required. I wanted to get the post up ASAP because if something happened and we needed an ambulance for example, there needed to be a street number there for them to find us. I installed this with solar lighting on top of it.

Sunday, June 12, 2016
Container Home: Installing Second Window and Door - 12 June 2016
This weekend, we finished installing the last of the Styrofoam panels on the roof. It made an enormous difference in temperature inside since the sun is now blocked from shining down directly on the steel roof.
We also got the second window installed. It was hot and no fun using a plasma cutter and welder in 90+ degree weather. Here is a pic of part of the wall as it was being cut out. As you can see, I went around and outlined it first.

My wife took a pic of me using the plasma cutter as I was cutting out the wall.

Here is a pic after I finished cutting it out.

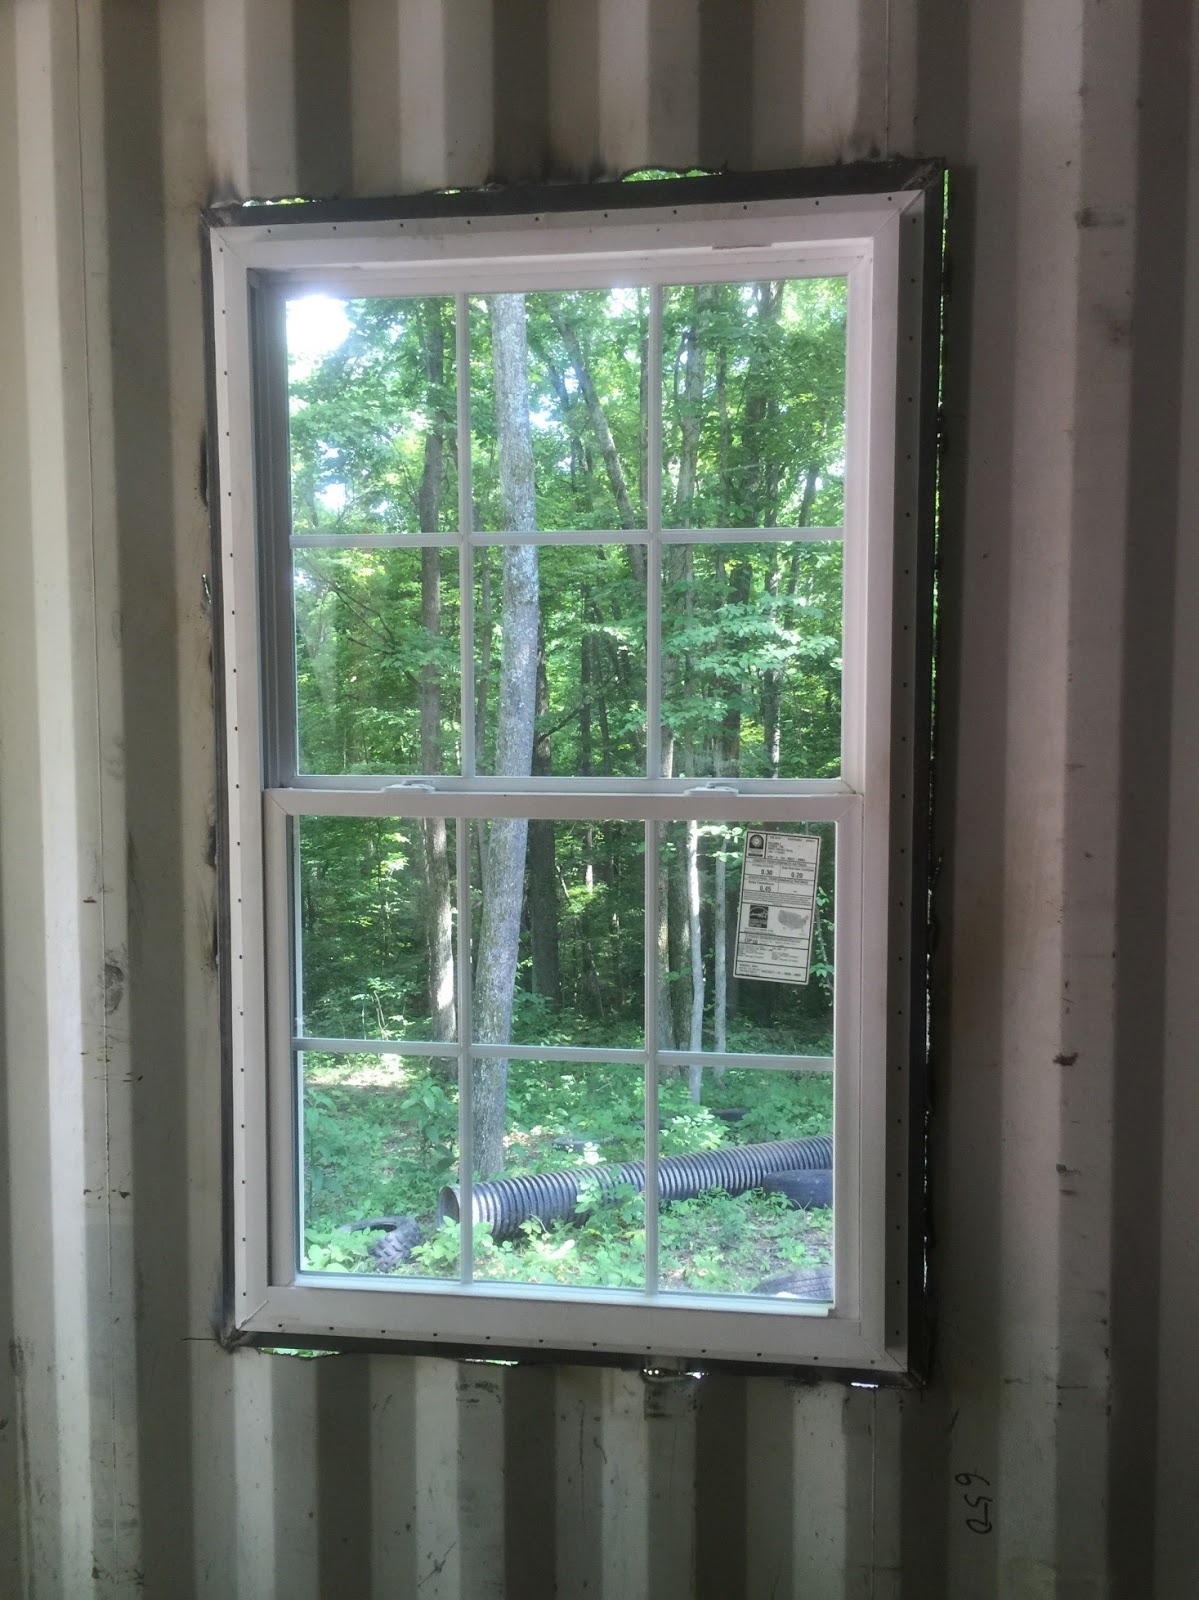
The next step was to install the window frame I had built back home. That is not the easiest because I not only had to cut a little more out on each side to properly fit it, but getting it lined up perfectly before welding it is not easy.

Once we got the frame installed, the next step was installing the window, which became a nightmare to us. The steel frame shrunk slightly after welding it into the wall. The window had to be shoved into place. We thought because it took a lot of pressure to push it in that it was nice and secure. WRONG! It fell out and shattered. I had to go back to Lowe's to get a new window. That was no fun at all and took away the rest of the afternoon. We did get it installed though before dark.

Once we got the new window installed, we then came back and caulked all of the openings. In the end, the frame will be covered, so I was not concerned with the white caulk over the black frame.

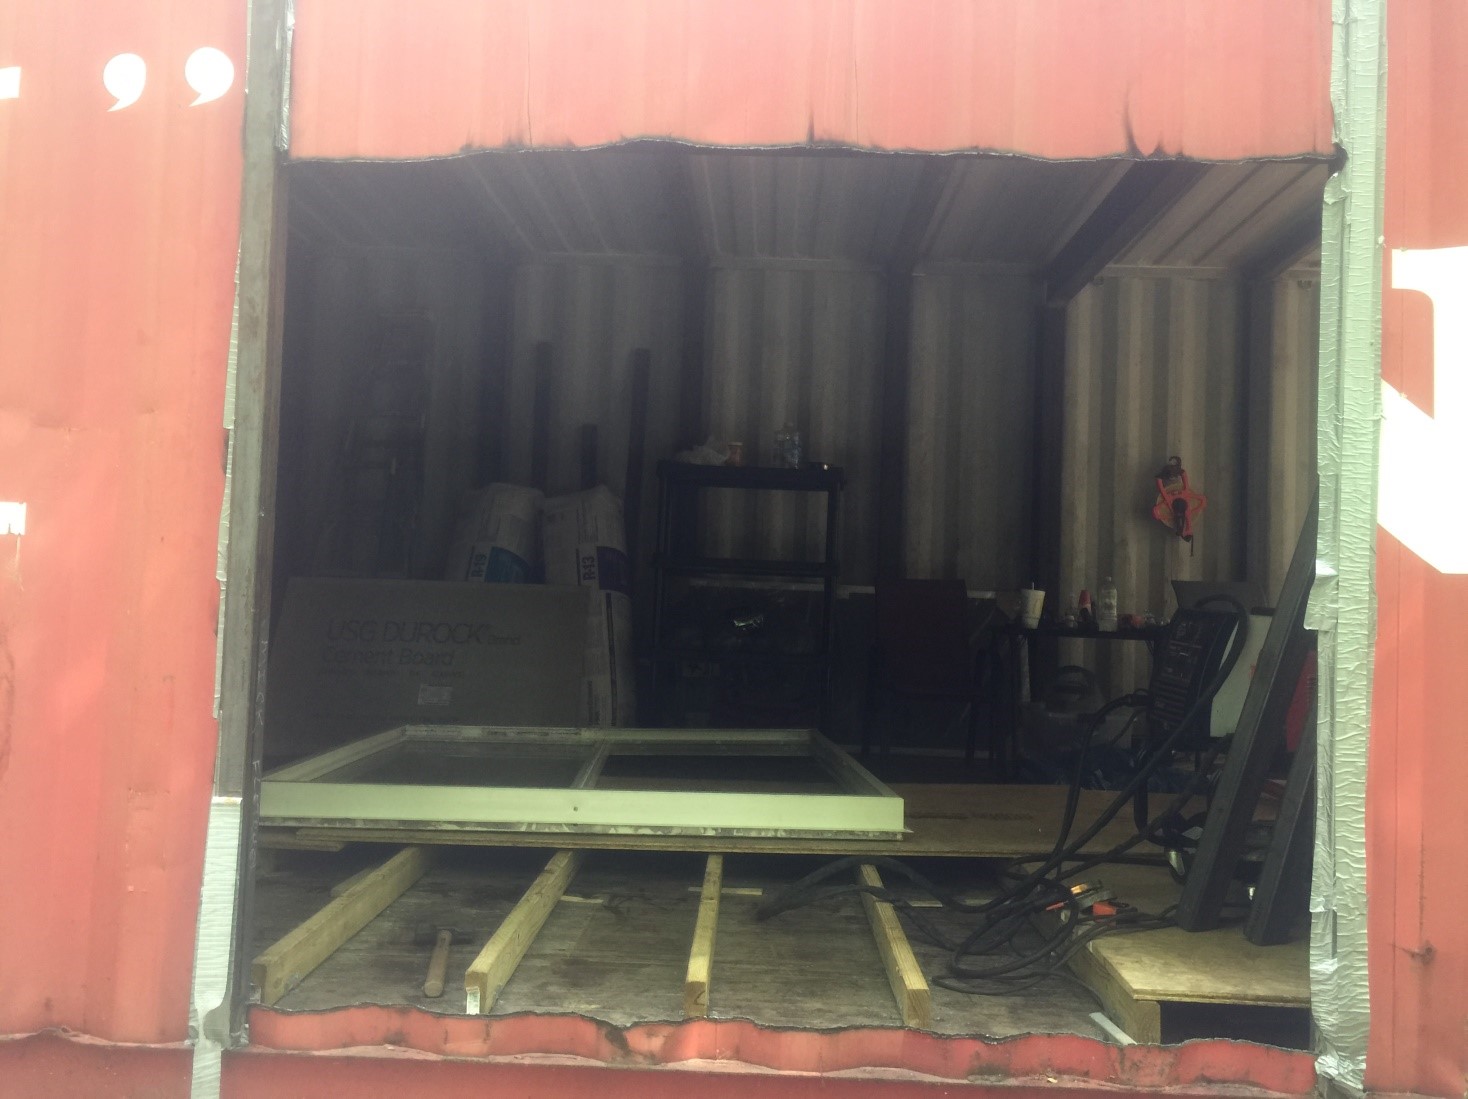
Once we finished the window, we started on installing the sliding glass door. Because of the window mishap, we did not finish the door. We did get the two vertical beams welded in place though.
I first started out by using the plasma cutter to cut out a wide enough sliver of wall so the 2"x3"x0.25" beam would fit from floor to ceiling on both sides. I had originally thought about building a frame around the door, like I did with the windows. I thought about the fact that the door will take a considerable amount of wall out and that it might structurally compromise the container. That is why I decided to weld two beams, one of each side of the door. It also makes it a lot easier to build out instead of trying to wrestle with a heavy rectangular frame. Here is a picture of the first sliver I cut out.


We also got the second window installed. It was hot and no fun using a plasma cutter and welder in 90+ degree weather. Here is a pic of part of the wall as it was being cut out. As you can see, I went around and outlined it first.

My wife took a pic of me using the plasma cutter as I was cutting out the wall.

Here is a pic after I finished cutting it out.

The next step was to install the window frame I had built back home. That is not the easiest because I not only had to cut a little more out on each side to properly fit it, but getting it lined up perfectly before welding it is not easy.

Once we got the frame installed, the next step was installing the window, which became a nightmare to us. The steel frame shrunk slightly after welding it into the wall. The window had to be shoved into place. We thought because it took a lot of pressure to push it in that it was nice and secure. WRONG! It fell out and shattered. I had to go back to Lowe's to get a new window. That was no fun at all and took away the rest of the afternoon. We did get it installed though before dark.
Once we got the new window installed, we then came back and caulked all of the openings. In the end, the frame will be covered, so I was not concerned with the white caulk over the black frame.

Once we finished the window, we started on installing the sliding glass door. Because of the window mishap, we did not finish the door. We did get the two vertical beams welded in place though.
I first started out by using the plasma cutter to cut out a wide enough sliver of wall so the 2"x3"x0.25" beam would fit from floor to ceiling on both sides. I had originally thought about building a frame around the door, like I did with the windows. I thought about the fact that the door will take a considerable amount of wall out and that it might structurally compromise the container. That is why I decided to weld two beams, one of each side of the door. It also makes it a lot easier to build out instead of trying to wrestle with a heavy rectangular frame. Here is a picture of the first sliver I cut out.

Once I got it cut out, I then welded the vertical beam in place. I did the same thing for the other beam. We placed the door up against the beams at the end and it fits perfectly.

When we return in two weeks, we will finish up installing the door. We are really excited to get that done, as it is a major part of the project.
A couple of other things were that we got the first of the insulation for the walls. We have an issue inside in that due to the cold of the ground up against the warm interior, condensation is occurring. To stop this, we are going to install the R-13 insulation down those walls. The second thing we got was the propane refrigerator, which is in the box on the left.

One more change we decided on making was to not seal the end doors like we had originally considered. Instead, we are going to install a sliding glass door behind each door thereby allowing us to open up the home even more when we are there. We will definitely keep the end doors as security when gone.
Saturday, June 4, 2016
Container Home: Ceiling Reinforcements and Subflooring - 04 June 2016
This weekend, my wife and I came over and actually got everything we could get done on Saturday. There were heavy thunderstorms to which I could not use the plasma cutter or welder. The first thing we did was to install the 2x6 pieces down the length of the container ceiling and the remaining part at the floor. These provide a place to attach the vertical 2x4s. Next, we installed the last two 4x4s at the ceiling. We did realize that we need one additional 4x4 to be installed near the front of the container so the 2x6 has one additional 4x4 to nail to. The next thing we did was to begin installing the remaining subfloor 2x4s to finish building out the subflooring. Once we got those completed, which took quite a while, we started installing the subflooring. We ended up only having about 60% of the subflooring for that side. I am going by Lowes today to pickup the remaining subflooring and other materials for next weekend. Luckily, the weather looks like it is going to be clear next weekend, so we will definitely get the window and sliding door installed, install the remaining Styrofoam sheathing on the roof, and install the remaining subflooring. If we have time, we will being installing the subfloor 2x4s on the right side also.
By the time we finished Saturday night, it was near dark and we came on home. We didn't get any pictures because we were exhausted. We'll definitely have pictures next weekend.
By the time we finished Saturday night, it was near dark and we came on home. We didn't get any pictures because we were exhausted. We'll definitely have pictures next weekend.
Tuesday, May 31, 2016
Container Home: Subflooring and Coal Tar Epoxy Application - 31 May 2016
I have not updated this for the last month because it has taken a very long time to complete the roof. I finally finished applying the coal tar epoxy last weekend after grinding all of the rust spots using SSPC-SP3 surface preparation standard.

Next was applying the coal tar epoxy. After the epoxy was applied, I began installing the foam sheaths on the roof. These are R-5 rated and provide the house with shielding from the direct sunlight. It dropped the inside surface temperature of the metal ceiling/roof from 138 degrees to 88 degrees.

As you can see, there is a very small portion at the end that didn't get the epoxy applied to it. I ran out. Once we finish the back side by installing the sliding glass door and the other window, one more gallon of the epoxy will be sufficient to finish that small portion on the roof and the back side. the Styrofoam sheaths were secured with liquid nail.
Another thing I got finished up was installing the second grounding rod. Due to the container being a metal frame, I want sufficient grounding. The rod will be braised to the container using zero gauge copper wire.

We also purchased our propane refrigerator. This is huge that we can have a refrigerator without needing electricity. Since the house is only a weekend getaway, we bought a small refrigerator without a freezer. We won't be there long enough to freeze items and the refrigerator will be turned off when we leave.

Another thing we have started doing is installing the subflooring. I started by installing the 2x4s. I used outdoor treated wood because I figured if there is ever a leak in the house, I do not want to have to worry about the wood being compromised. I am starting with the left container and installing the subflooring first there because I need to install the sliding glass door. I need to know the height of the flooring so I know how high to place the door.

I only purchased one piece of plywood because I wanted to see if 5/16" was thick enough for the sub floor. It is. As you can see in the picture, I also leveled the joists with shims.

As far as the door goes, I have changed the way it will be installed. Originally, I was going to weld a frame which the door would fit into. I changed that when the thought occurred to me that door is a big portion of the back wall that will come out. It is possible that it could compromise the structural integrity of the container. To get around that, I have decided that I will weld 2"x3"x.25" vertical beams into the wall that will function as the side beams for the frame. This will reinforce the structure while also making it easier to build out the frame. Next, I will cut out the rest of the doorway and weld a horizontal 2"x3" beam across the bottom and one across the top. This will form the frame for the door. It also makes it easier to install because 1) I don't have to man handle a huge rectangular frame into the wall and 2) there are no 45 degree cuts I need to make for the corners.
Sunday, May 1, 2016
Container Home: Installing the ceiling 4x4s - 01 May 2016
This weekend, my wife and I got the 4x4s installed across the ceiling of both containers. This gives the containers the structural support that holds them up against the forces of the earth. They also give a place at the ceiling to attach the 2x4s to when we begin building out the interior framing. The third thing it gives is structural support for the roof. The roofs of shipping containers cannot hold much weight because of the wide distance between the structure of the container and that they are fourteen gauge steel.
The second thing we began working on was the roof. As my wife cleaned the roof, I ground down the rust spots. We got about 20% of the roof completed. Next weekend, that is going to be the only task to work on as we want to get it completed before summer temperatures arrive. I plan on finishing up the grinding next weekend and applying the coal tar epoxy. Two weeks from that, I am going to install the vapor barrier, foam sheeting, and a secondary vapor barrier to finish up the roof. This will shield it from the sun and will also provide a mounting area for some on the solar panels.
I was not able to get any pictures this weekend. As we were finishing up yesterday, severe weather came in with flash flooding. We just wanted to get out and get back home. One good thing was that we saw the drainage system I installed worked great. Water was flowing out of it with no problems. We were very satisfied.
Sunday, April 24, 2016
Container Home: Putting the House Underground - 24 April 2016
This was a very big weekend for me. We got the containers underground!!! Yes, they are now mostly underground. We left the two ends exposed until the gabion baskets arrive either this week or next. While passing by Straight Line Fencing in Clarksville, TN, I noticed they have polished rocks. That is all that we are going to need for the baskets. The backsides will be exposed to the gravel and dirt, so we are going to attach the polished rocks to the side facing the driveway and then fill the inside with the gravel.
The first thing I had to do was to finish installing the sewage plumbing inside. I used my plasma cutter to cut out the holes in the wall and then ran the piping through and connected it to the outside piping.

After those were installed, the next thing was to haul the gravel in and put it up against the wall. It took a total of four dump truck loads of gravel to fill it up. Here is a video as we were getting started.
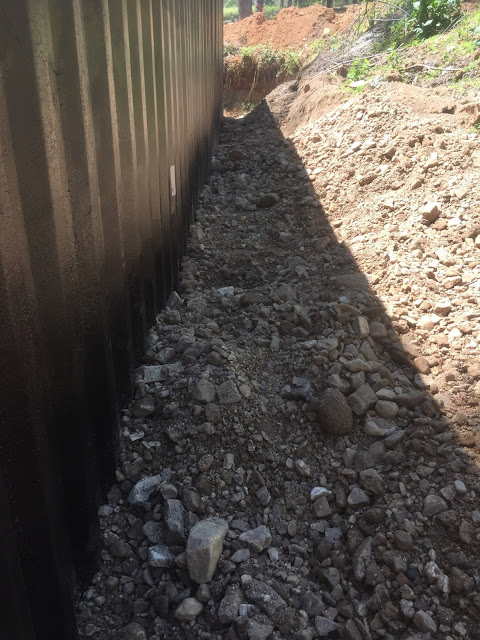
These are pictures of what it looked like after we put most of it underground. This one is looking from the left side where the driveway will be located.


The first thing I had to do was to finish installing the sewage plumbing inside. I used my plasma cutter to cut out the holes in the wall and then ran the piping through and connected it to the outside piping.

After those were installed, the next thing was to haul the gravel in and put it up against the wall. It took a total of four dump truck loads of gravel to fill it up. Here is a video as we were getting started.
These are pictures of what it looked like after we put most of it underground. This one is looking from the left side where the driveway will be located.

Here is another picture further out from the driveway side.

Here is one looking from the front side.

Finally, here is one looking from the right side. As you can see, we left off the far right for the gabion baskets on that side. Oh yeah, you can also see the solar panels on the roof.

After I got it underground, I noticed it slight pushed the roof up. To counter this, I installed 4x4's at the ceiling which are plenty to hold that back.

The internal steel I-Beams worked great at holding the walls in place. It is going to take a little while for the gravel to completely settle. Next weekend, I will be installing the rest of the 4x4's that will serve three functions. The first is that they will provide structural integrity to the ceiling. Second, they will give structural reinforcement to the i-beams. Third, they will reinforce the roof. Fourth, they will provide an attachment point for the internal wood construction.

Here is a video of burying the container:
Next weekend, I am going to install the rest of the 4x4's and install screws into the steel plates beneath the i-beams for additional support.
Sunday, April 17, 2016
Container Home: Second Coat of Epoxy and Drainage Piping - 17 April 2016
The first thing my wife and I did was to apply a second coat of the coal tar epoxy to the side walls. I don't want to have to dig those out again due to any rust. After that, we got the sewage piping installed around the containers. It took quite a while but we finally finished that Saturday afternoon. We first had to start out with cutting the cinder blocks so the drainage pipe would lay flat on the ground for maximum drainage.

This is what it looks like up close.

The next thing we did was to install the sewage pipe, which is colored in turquoise. You can see in the picture below where the joint is that the kitchen sink will drain out to.

This is a picture of the joint that travels around the corner of the container. You can also see the material over the white drainage pipe that keeps sediment from going in.

Here is the picture of the pipe on side of the containers. I added an emergency pipe to the geothermal piping in the even flooding was massive enough to flood those pipes. Also, the wire you see near the bottom is the high speed internet line.

Once we finished this, we began pouring the riverbed gravel over it. The gravel now comes up 1/4 of the height of the containers.
Here is another picture. I still need to cut out the holes in the side to run the sewage pipe out. That is why you can barely see the two ditches in the pipe that will have the drain pipes running out of the wall and into the main sewage pipe.


This is what it looks like up close.

The next thing we did was to install the sewage pipe, which is colored in turquoise. You can see in the picture below where the joint is that the kitchen sink will drain out to.

This is a picture of the joint that travels around the corner of the container. You can also see the material over the white drainage pipe that keeps sediment from going in.

Here is the picture of the pipe on side of the containers. I added an emergency pipe to the geothermal piping in the even flooding was massive enough to flood those pipes. Also, the wire you see near the bottom is the high speed internet line.

Once we finished this, we began pouring the riverbed gravel over it. The gravel now comes up 1/4 of the height of the containers.

Here is another picture. I still need to cut out the holes in the side to run the sewage pipe out. That is why you can barely see the two ditches in the pipe that will have the drain pipes running out of the wall and into the main sewage pipe.

Sunday, April 10, 2016
Container Home: Installing Final Structural Ceiling I-Beam - 10 April 2016
This weekend, I finished up installing the last of the i-beams down the center of the containers. These give it the structural reinforcements it needs since the center walls were cut out.

Here is the final picture of it after it was welded in place.

The next thing I did was to finish welding the container to the foundation. As you saw earlier in this blog, I inlaid steel in the concrete so the containers could be welded. Here is a picture of one of the welds. This is before I cleaned up the weld.

The next thing I did was to weld the seam down the center of the container. I had to wait on this until I had the I-beams installed because the house jacks sat on that seem holding the beams up while I welded them.

The final thing I did was to temporarily secure the solar panels on the roof. I tied them down with rope so they won't blow off. They will be permanently installed later on when the trees are cut down to make room for them.
Monday, April 4, 2016
Container Home: Installing Structural Wall Supports - 04 April 2016
This weekend, I hauled my final two loads of steel. I know my Jeep is glad of that with hauling 890 pounds on the roof. It included the last two 6" i-beams for reinforcing the ceiling and the final six 4" i-beams for reinforcing the walls.

I got the final six i-beams welded in place to finish reinforcing the two walls that will be underground.

After getting the wall supports finished, I began on the ceiling supports. Due to problems I ran into with the back support, it took up much of my time. After I got it welded in place, I got started putting the center support in place, which entailed not only hoisting it up, but also cutting it down to size so that it would fit in place.
To get it hoisted up, I used a hoist in the center and then attached one strap on each end of the beam to support the ends.

As I slowly hoisted it up, I had to readjust the straps on each end, which is what took so long.

The hoist could only pull it up so far. I finally had to remove the hoist and replace it with a third strap. To slowly adjust the straps on the ends, I had to hold the beam with my shoulder while I released the strap to be able to pull it up further. Yes, my shoulders are sore today! Here is a final picture of the beam in place. I put the house jacks underneath it to push it the last few inches. I did not have enough time yesterday evening to weld it, so that will be done next weekend.

Another thing I did this weekend was to mark the trees that must be cut down to make room for the solar panels. This is a picture of the trees I marked with the ribbon around them. Luckily, a neighbor saw the marked trees and asked why they were marked. He is going to cut them down for me and take all of the wood for firewood. There will be no cost to me for that.

Another thing I did was to clear the concrete path around the container so that we can implement the concrete blocks for the drainage and sewage pipes. I also put the final seal of foam at the base of the containers.

The other thing I did was to make the current four solar panels permanent so that I no longer have to haul the deep cycle battery back with me. They are now mounted on the roof. When the trees are taken down, I am going to move the panels to their final resting place.